
That tired, worn, or simply out-of-sync carpet has finally reached its end. Perhaps you’re envisioning gleaming hardwood floors, sleek tiles, or a fresh, modern carpet in its place. The idea of ripping out the old flooring might initially feel like a Herculean task, fraught with mystery and potential mess. However, armed with the right knowledge, tools, and a methodical approach, removing carpet can be a surprisingly accessible and empowering DIY endeavor.
This in-depth guide will meticulously walk you through ten straightforward steps to safely and effectively liberate your floors, providing you with the confidence to tackle this home renovation project head-on.
The Pre-Game Prep: Assembling Your Essential Toolkit
Before you even contemplate making that first incision, meticulous preparation is paramount. Gathering all the necessary tools and safety equipment beforehand will streamline the entire process, minimizing frustration and ensuring your well-being. Think of this as assembling your arsenal for a successful flooring liberation mission. Here’s your essential checklist:
- The Precision Blade: Utility Knife with a Stockpile of Sharp Blades: Your utility knife is your primary cutting tool. A razor-sharp blade will make clean, efficient cuts through the carpet fibers and backing. Dull blades will snag and require more force, increasing the risk of accidents. Keep a generous supply of replacement blades readily available, as they will inevitably lose their edge.
- The Gripping Force: Robust Pliers: These trusty tools will prove invaluable for firmly grasping and pulling up stubborn carpet edges, stray fibers, and those pesky embedded staples. Needle-nose pliers can be particularly useful for maneuvering in tight corners.
- The Protective Barrier: Durable Work Gloves: Your hands will be your primary point of contact with the carpet, tack strips, and potential debris. Sturdy work gloves will shield them from sharp tacks, abrasive carpet backing, and general grime, preventing cuts and irritation.
- The Vision Shield: Indispensable Safety Glasses: Debris, flying staples, and dust particles are inevitable byproducts of carpet removal. Protecting your eyes with safety glasses is non-negotiable. Ensure they fit comfortably and provide comprehensive coverage.
- The Lifting Leverage: Sturdy Pry Bar or Versatile Flathead Screwdriver: These tools will act as your leverage to gently lift stubborn carpet sections that are glued or heavily adhered. They are also crucial for prying up the tenacious tack strips that line the perimeter of the room.
- The Scraping Savior: Efficient Floor Scraper: Once the carpet and padding are gone, you’ll likely encounter remnants of adhesive and stubborn padding clinging to the subfloor. A floor scraper, with a sharp, sturdy blade, will make quick work of these remnants, preparing a clean surface for your new flooring.
- The Containment Crew: Heavy-Duty Trash Bags or Protective Old Sheets/Tarps: You’ll need a reliable way to contain and transport the removed carpet and padding. Heavy-duty trash bags are ideal for smaller sections, while old sheets or tarps can be used to wrap larger rolls, preventing them from unraveling and making them easier to drag.
- The Securing Strategist: Indispensable Duct Tape (Optional but Highly Recommended): Duct tape is your ally in keeping rolled-up sections of carpet and padding tightly bound. This prevents them from unfurling during transport and disposal, saving you considerable hassle.
- The Debris Destroyer: Powerful Vacuum Cleaner (Ideally a Shop Vac): A powerful vacuum cleaner, especially a shop vac designed for handling larger debris, is essential for cleaning up as you go and for a thorough final sweep of the subfloor. This removes staples, tacks, dust, and carpet fibers, creating a clean slate.
- The Comfort Crusader: Highly Recommended Knee Pads: Removing carpet often involves prolonged periods of kneeling, which can put significant strain on your knees. Investing in a good pair of knee pads will provide crucial cushioning and support, making the job significantly more comfortable and preventing potential discomfort.
Read more: 10 Budget-Friendly Fixes to Refresh Your Space
The Ten Steps to Carpet Removal Mastery:
With your toolkit assembled and your safety gear donned, you’re ready to embark on the carpet removal journey. Follow these ten easy steps for a smooth and successful transformation:
The Grand Clearance: Emptying the Room Entirely
Before any cutting or pulling begins, ensure the room is completely devoid of all furniture, rugs, decorations, and any other obstructions. A clear and open workspace is paramount for safety and efficiency. Don’t attempt to maneuver around obstacles; it will only hinder your progress and increase the risk of damaging your belongings or the surrounding walls.
The Strategic Blueprint: Planning Your Cutting Path
Take a moment to survey the room and strategize how you will divide the carpet into manageable sections for removal. For larger rooms, cutting the carpet into strips, typically 2-3 feet wide, will make them easier to roll, carry, and dispose of. Consider the placement of doorways, built-in features, and any other elements that might influence your cutting strategy. Visualize the most efficient way to section the carpet.
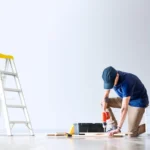
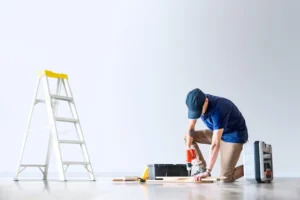
The Initial Incisions: Making Your Precision Cuts
Using your sharp utility knife, carefully begin making your planned cuts through the carpet. Work deliberately and with controlled pressure, ensuring you cut cleanly through all layers of the carpet, including the backing. Be acutely aware of the subfloor beneath and avoid pressing too hard to prevent accidental damage. For wall-to-wall carpet, initiate your first cut along a wall, a few inches away from the baseboard. This creates an initial edge that you can easily grip.
The Gradual Extraction: Gripping and Pulling Up the Carpet
Once you have a cut edge, use your pliers to firmly grasp the carpet and begin the process of pulling it up. Work slowly and steadily, maintaining a consistent pulling motion parallel to the floor. Avoid jerky movements that could cause the carpet to tear unevenly. If the carpet is heavily glued down, you may need to employ your pry bar or flathead screwdriver to gently loosen it from the subfloor, working incrementally along the adhered sections.
The Tack Strip Takedown: Removing with Utmost Caution
Around the perimeter of the room, you’ll encounter tack strips – thin strips of wood embedded with a multitude of sharp, upward-facing tacks that securely hold the carpet in place. Using your pry bar, carefully lever these strips away from the subfloor. Exercise extreme caution during this step, as these tacks are incredibly sharp and can easily cause punctures. Once lifted, dispose of the tack strips immediately and safely in a sturdy, puncture-proof container.
The Padding Pursuit: Addressing Lingering Underlayment
In many instances, the carpet padding will detach along with the carpet itself. However, sometimes sections of the padding remain stubbornly adhered to the subfloor. Employ your floor scraper to systematically remove any remaining pieces of padding. For particularly tenacious areas, apply firm, even pressure with the scraper.
The Adhesive Annihilation: Tackling Sticky Residue
If your carpet was glued down, you’ll likely be confronted with residual adhesive clinging to the subfloor. Your trusty floor scraper will again be your primary tool. For particularly stubborn or widespread adhesive residue, consider using a commercial adhesive remover specifically formulated for flooring. Always adhere strictly to the manufacturer’s instructions, ensure adequate ventilation in the room, and wear appropriate respiratory protection if recommended.
The Organized Exit: Rolling and Securing the Debris
As you remove sections of carpet and padding, immediately roll them up tightly. Secure each roll with ample duct tape to prevent it from unraveling, which will significantly simplify handling, transport, and disposal. Aim for manageable roll sizes that you can comfortably lift and carry.
The Meticulous Cleanup: A Thorough Debris Sweep
Once all the carpet and padding have been removed, it’s time for a comprehensive cleanup. Utilize your vacuum cleaner, ideally a shop vac, to thoroughly vacuum the entire subfloor. Pay particular attention to corners, edges, and along the baseboards, where staples, tacks, carpet fibers, and dust tend to accumulate. A clean subfloor is crucial for a successful installation of your new flooring.
The Subfloor Survey: Inspecting for Underlying Issues
Finally, conduct a thorough inspection of your exposed subfloor. Carefully examine it for any signs of damage, such as holes, cracks, water stains, or unevenness. Address any necessary repairs or leveling before proceeding with the installation of your new flooring. This is the opportune moment to ensure a solid and stable foundation for your upcoming flooring project.
FAQs
Is it difficult to remove carpet myself?
Generally, removing carpet yourself is a moderately easy DIY project that most homeowners can accomplish with the right tools and a bit of effort. The difficulty can vary depending on how the carpet was installed (glued vs. tacked) and the size of the room. Our 10-step guide breaks down the process into manageable tasks, making it less daunting.
What tools do I absolutely need to remove carpet?
The essential tools for removing carpet include a sharp utility knife with extra blades for cutting the carpet, pliers for gripping and pulling, work gloves and safety glasses for protection, and a pry bar or flathead screwdriver for lifting tack strips and loosening glued areas. Knee pads are highly recommended for comfort.
What should I do with the old carpet and padding after removing it?
Once removed, roll up the carpet and padding and secure them with duct tape for easier handling. Check your local waste management guidelines for proper disposal. Some areas may offer bulk waste pickup or have specific instructions for carpet disposal. Consider looking into local recycling facilities, as some may accept carpet and padding.
Will removing carpet damage the subfloor?
If done carefully, removing carpet shouldn’t significantly damage the subfloor. However, be cautious when cutting the carpet to avoid scoring the wood or concrete underneath. When removing tack strips, lift them gently rather than forcefully to minimize potential damage. You may need to scrape off residual adhesive or padding, but this is usually superficial. After removal, inspect the subfloor for any existing damage that needs repair before installing new flooring.
How long does it typically take to remove carpet from a room?
The time it takes to remove carpet varies based on the size of the room, how the carpet was installed, and your level of experience. For a small to medium-sized room (e.g., 10×12 or 12×15 feet), it might take anywhere from 1 to 3 hours to remove the carpet and padding. Larger rooms or carpets that are heavily glued down will naturally take longer. Factor in additional time for cleanup and removing any adhesive residue.
Crucial Considerations and Safety First Practices:
- Prioritize Safety: Always wear your work gloves and safety glasses throughout the entire process. Don’t underestimate the sharpness of tacks and utility knife blades. Knee pads are a vital investment in your comfort and well-being.
- Ventilation is Key: If you are using any chemical adhesive removers, ensure the room is well-ventilated by opening windows and using fans.
- Sharp Object Awareness: Be constantly mindful of the sharp blades of your utility knife and the pointed tacks on the tack strips. Dispose of these items responsibly and immediately.
- Lift Smart: When lifting and moving rolled-up sections of carpet and padding, always lift with your legs, keeping your back straight, to prevent injury. These rolls can be surprisingly heavy.
- Hidden Hazards: Be vigilant for any hidden staples or tacks that might have been missed during the initial removal.
- Responsible Disposal: Consider the proper disposal of your old carpet and padding. Research local regulations and explore potential recycling options in your area.
- Asbestos Awareness: In older homes, be acutely aware of the potential for asbestos-backed carpet. If you suspect the presence of asbestos, do not attempt to remove it yourself. Asbestos is a hazardous material that requires professional abatement. Contact a certified asbestos removal company immediately for safe and compliant removal.
Read more: Double Hung vs Single Hung Windows
Removing carpet is a tangible step in transforming your living space. By approaching it methodically, equipping yourself properly, and prioritizing safety, you can confidently conquer this DIY project and unveil the potential that lies beneath. The satisfaction of a job well done and the anticipation of your new flooring will make every step of this empowering process worthwhile. So, take a deep breath, gather your tools, and embark on the rewarding journey of reclaiming your floors.


No comment yet, add your voice below!